Facebook Live offers a seamless viewing experience for people to watch your livestream and then see an archived version after you're done broadcasting.
- When you turn on your camera, a new Facebook post is created on your profile and indicates that you're broadcasting live.
- When you stop broadcasting, Facebook automatically converts the video to an archived version and shows people the recording when they look at that post later.
I wanted to see if I could do this on my own website, without any third-party services involved. It turns out there is free software available to put this kind of thing together yourself!
The diagram below illustrates the various pieces involved. In this post, we'll walk through setting up each. In this setup, the streaming server is separate from your website. You can of course host both on the same server, but I found it was nicer to fiddle with the nginx settings on a separate server rather than recompiling and restarting nginx on my website's server.
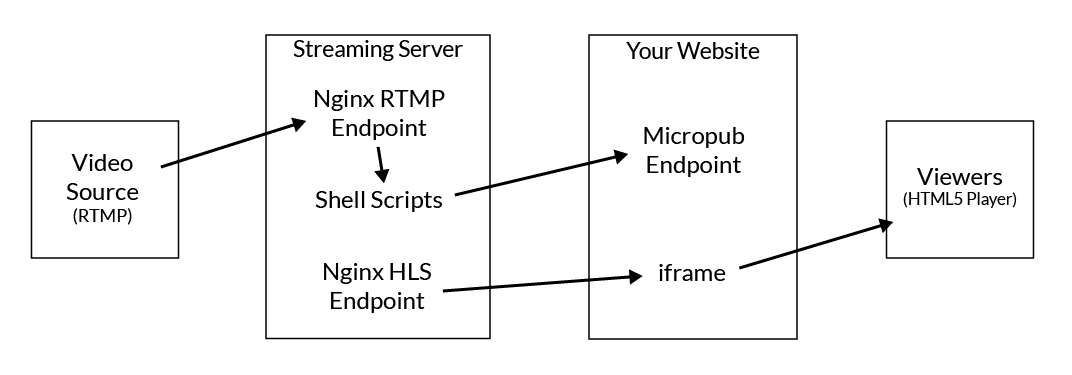
Video Source
You should be able to use any RTMP client to stream video to the server! I've tested this setup with the following video sources:
- Teradek Vidiu hardware encoder (connected to an HDMI switcher or camcorder)
- On my Mac, I've used OBS, a cross-platform desktop application
- On iOS, Larix Broadcaster (also available on Android)
The job of the video source is to perform the h.264 encoding and send the video stream to the RTMP endpoint on the streaming server. Once configured, starting the broadcast is as simple as starting the streaming device.
Building the Streaming Server
Nginx with RTMP extension
The instructions below are a summary of this excellent guide.
- Download build system dependencies
- Download nginx source code
- Download RTMP extension source code
- Compile nginx with the extension
Download the build system dependencies
sudo apt-get install build-essential libpcre3 libpcre3-dev libssl-dev
Find the latest nginx source code at http://nginx.org/en/download.html
wget http://nginx.org/download/nginx-1.10.2.tar.gz
Download the rtmp module source
wget https://github.com/arut/nginx-rtmp-module/archive/master.zip
Unpack both and enter the nginx folder
tar -zxvf nginx-1.10.2.tar.gz
unzip master.zip
cd nginx-1.10.2
Build nginx with the rtmp module
./configure --with-http_ssl_module --add-module=../nginx-rtmp-module-master
make -j 4
sudo make install
Now you can start nginx!
sudo /usr/local/nginx/sbin/nginx
Configuration
The steps below will walk through the following. Comments are inline in the config files.
- Set up the nginx configuration to accept RTMP input and output an HLS stream
- Configure the event hooks to run the bash commands that will make Micropub requests and convert the final video to mp4
- Set up the location blocks to make the recordings available via http
- Ensure the folder locations we're using are writable by nginx
First, add the following server block inside the main http block.
server {
  server_name stream.example.com;

  # Define the web root where we'll put the player HTML/JS files
  root /web/stream.example.com/public;

  # Define the location for the HLS files
  location /hls {
    types {
      application/vnd.apple.mpegurl m3u8;
    }

    root /web/stream.example.com; # Will look for files in the /hls subdirectory

    add_header Cache-Control no-cache;

    # Allow cross-domain embedding of the files
    add_header Access-Control-Allow-Origin *;
  }
}
Outside the main http block, add the following to set up the rtmp endpoint.
rtmp {
  # Enable HLS streaming
  hls on;
  # Define where the HLS files will be written. Viewers will be fetching these
  # files from the browser, so the `location /hls` above points to this folder as well
  hls_path /web/stream.example.com/hls;
  hls_fragment 5s;

  # Enable recording archived files of each stream
  record all;
  # This does not need to be publicly accessible since we'll convert and publish the files later
  record_path /web/stream.example.com/rec;
  record_suffix _%Y-%m-%d_%H-%M-%S.flv;
  record_lock on;

  # Define the two scripts that will run when recording starts and when it finishes
  exec_publish /web/stream.example.com/publish.sh;
  exec_record_done /web/stream.example.com/finished.sh $path $basename.mp4;

  access_log logs/rtmp_access.log combined;
  access_log on;

  server {
    listen 1935;
    chunk_size 4096;

    application rtmp {
      live on;
      record all;
    }
  }
}
Starting Streaming
When a stream starts, the nginx extension will run the script defined by the exec_publish hook. We'll set up this script to create a new post on your website via Micropub. This post will contain the text "Streaming Live" and will include HTML with an iframe containing the <video> tag and the necessary Javascript to enable the video player.
The nginx extension takes care of building the HLS files that the player uses, and will broadcast the input stream to any client that connects.
Your server will need to support Micropub for this command to work. Micropub is a relatively simple protocol for creating and updating posts on your website. You can find Micropub plugins for various software, or write your own code to handle the request. For the purposes of this example, you will need to manually generate an access token and paste it into the scripts below.
Save the following as publish.sh
#!/bin/bash

file_root="/web/stream.example.com/rec"
web_root="http://stream.example.com"

micropub_endpoint=https://you.example.com/micropub
access_token=123123123

# Create the post via Micropub and save the URL
url=`curl -i $micropub_endpoint -H "Authorization: Bearer $access_token" \
  -H "Content-Type: application/json" \
  -d '{"type":"h-entry","properties":{"content":{"html":"<p>Streaming Live</p><iframe width=\"600\" height=\"340\" src=\"http://stream.example.com/live.html\"></iframe>"}}}' \
  | grep Location: | sed -En 's/^Location: (.+)/\1/p' | tr -d '\r\n'`

# Write the URL to a file
echo $url > $file_root/last-url.txt
When the Broadcast is Complete
When the source stops broadcasting, the nginx extension will run the script defined by the exec_record_done hook. This script will eventually update the post with the final mp4 video file so that it appears archived on your website.
- Update the post to remove the iframe and replace it with a message saying the stream is over and the video is being converted
- Do the conversion to mp4 (this may take a while depending on the length of the video)
- Create a jpg thumbnail of the video
- Update the post, removing the placeholder content and replacing it with the thumbnail and final mp4 file
Save the following as finished.sh
#!/bin/bash

input_file=$1
video_filename=$2
# Define the location that the publicly accessible mp4 files will be served from
output=/web/stream.example.com/public/archive/$2;

file_root="/web/stream.example.com/rec"
web_root="http://stream.example.com"

micropub_endpoint=https://you.example.com/micropub
access_token=123123123

# Find the URL of the last post created
url=`cat $file_root/last-url.txt`

# Replace the post with a message saying the stream has ended
curl $micropub_endpoint -H "Authorization: Bearer $access_token" \
  -H "Content-Type: application/json" \
  -d "{\"action\":\"update\",\"url\":\"$url\",\"replace\":{\"content\":\"<p>The live stream has ended. The archived version will be available here shortly.</p>\"}}"

# Convert the recorded stream to mp4 format, making it available via HTTP
/usr/bin/ffmpeg -y -i $input_file -acodec libmp3lame -ar 44100 -ac 1 -vcodec libx264 $output;
video_url="$web_root/archive/$video_filename"

# Generate a thumbnail and send it as the photo
ffmpeg -i $output -vf "thumbnail,scale=1920:1080" -frames:v 1 $output.jpg
photo_url="$web_root/archive/$video_filename.jpg"

# Replace the post with the video and thumbnail (Micropub update)
curl $micropub_endpoint -H "Authorization: Bearer $access_token" \
  -H "Content-Type: application/json" \
  -d "{\"action\":\"update\",\"url\":\"$url\",\"replace\":{\"content\":\"<p>The live stream has ended. The archived video can now be seen below.</p>\"},\"add\":{\"video\":\"$video_url\",\"photo\":\"$photo_url\"}}"
Note that your Micropub endpoint must support JSON updates, as well as recognizing the photo and video properties as URLs rather than file uploads. The filenames sent will be unique, so it's okay for your website to link directly to the URLs provided, but your endpoint may also want to download the video and serve it locally instead.
Web Player
We'll host the HLS video player on the streaming server, so that you don't have to worry about uploading this javascript to your website. We'll use video.js with the HLS plugin.
Create a file live.html in the web root and copy the following HTML.
<!DOCTYPE html>
<html>
<head>
  <link href="https://vjs.zencdn.net/5.8.8/video-js.css" rel="stylesheet">
  <style type="text/css">
    body {
      margin: 0;
      padding: 0;
    }
  </style>
</head>
<body>
  <video id="video-player" width="600" height="340" class="video-js vjs-default-skin" controls>
    <source src="http://stream.example.com/hls/live.m3u8" type="application/x-mpegURL">
  </video>

  <script src="https://vjs.zencdn.net/5.8.8/video.js"></script>
  <script src="https://cdnjs.cloudflare.com/ajax/libs/videojs-contrib-hls/3.6.12/videojs-contrib-hls.js"></script>
  <script>
  var player = videojs('video-player');
  player.play();
  </script>
</body>
</html>
Now when you view live.html in your browser, it will load the streaming player and let you start playing the stream! This is the file that we'll be using in an iframe in posts on your website.
Setting up your Website
As previously mentioned, the scripts above use Micropub to create and update posts. If your website is a fully conformant Micropub endpoint, you shouldn't need to do anything special for this to work!
You will need to make sure that your website allows Micropub clients to create posts with HTML content. You will also need to ensure your endpoint supports the photo and video properties supplied as a URL. You can hotlink the URLs your endpoint receives instead of downloading the files if you want, or your endpoint can download a copy of the video and serve it locally.
Realtime Updates
To really make this shine, there are a few things you can do to enable realtime updates of your posts for viewers.
- When your Micropub endpoint creates or updates a post, broadcast the HTML of the post on an nginx push-stream channel, and use Javascript on your home page to insert the post at the top of your feed.
- Use WebSub (formerly known as PubSubHubbub) to publish updates of your home page to subscribers who may be reading your website from a reader.
Doing this will mean someone who has your home page open in a browser will see the new livestream appear at the top as soon as you start broadcasting, and they'll be able to see it change to the archived video when you're done. People following you in a reader will see the new post with the streaming player when the reader receives the WebSub notification!
Publish Once, Syndicate Elsewhere
Since the nginx RTMP extension supports rebroadcasting the feed to other services, you can even configure it to also broadcast to Facebook Live or YouTube!
You'll need to find the RTMP endpoint for your Facebook or YouTube Live account, and configure a new block in your nginx settings.
Doing this means you can use Facebook and YouTube as additional syndications of your live stream to increase your exposure, or treat them as an automatic backup of your videos!

There's an "out of the box" solution now too:
https://owncast.online/