This tutorial will walk you through setting up an ATEM Mini Pro kit you can ship to a remote location and then control from your studio. You can use this to ship a remote interview kit to someone where all they have to do is plug in a few connections and you'll be able to control everything remotely!
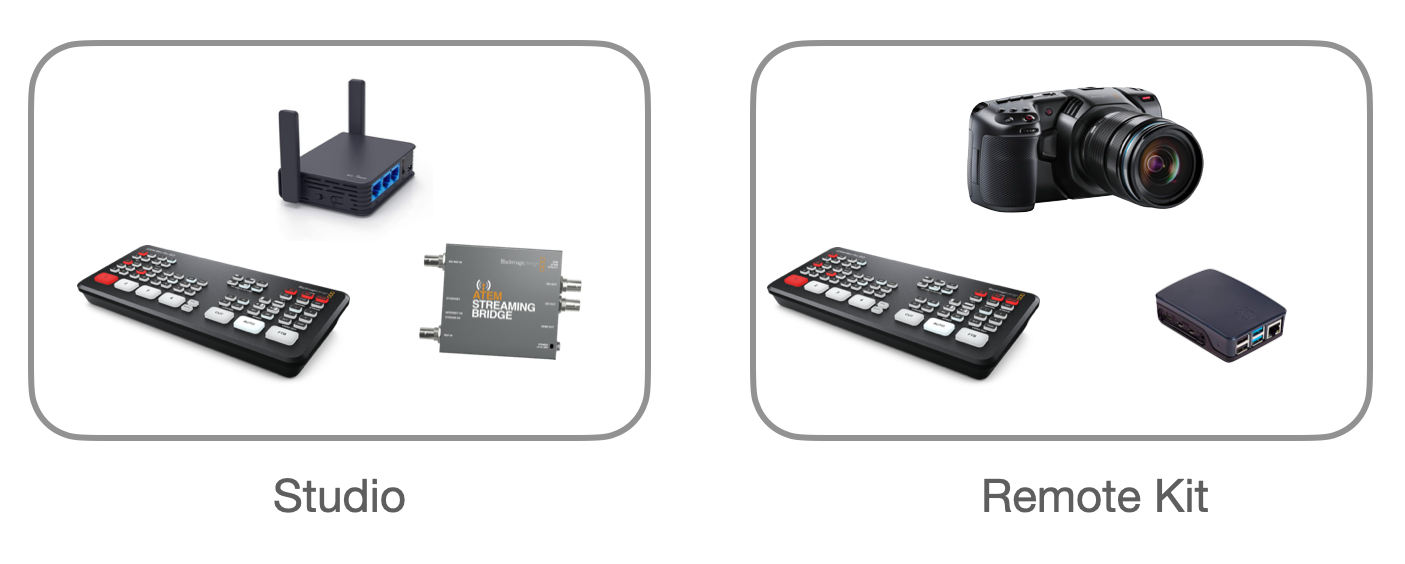
The overall idea is you'll ship out an ATEM Mini Pro (or ISO), a Blackmagic Pocket Cinema Camera 4K (or any other camera, but the Pocket 4K can be controlled by the ATEM!), and a Raspberry Pi. The guest will connect the Raspberry Pi to their home network, connect the camera's HDMI to the ATEM, turn everything on, and you'll immediately be able to control the remote end yourself!
The remote ATEM can then stream to any streaming service directly, or if you have a Streaming Bridge, you can get a high quality video feed of the remote guest brought directly into your studio!
Devices Used in this Tutorial
- ATEM Mini Pro or ATEM Mini Pro ISO
- GL.iNet AR750S Travel Router
- Raspberry Pi 4 (a Pi 3 will also work, but they aren't that much cheaper anyway)
- a MicroSD Card for the Raspberry Pi, I like the 32gb A2 cards
- a USB Ethernet adapter to get an additional ethernet port on the Raspberry Pi
- Blackmagic Pocket Cinema Camera 4K (any camera will do, but the Pocket 4K can be controlled remotely too!)
- Blackmagic Streaming Bridge to receive the remote ATEM video feed in your studio
Set up the Studio Side
We'll start with setting up the studio side of the system. This is where your computer to control the remote ATEM will be, and this end will have the VPN server. If you have a Streaming Bridge, it would be on this end as well in order to receive the streaming video feed from the remote ATEM.
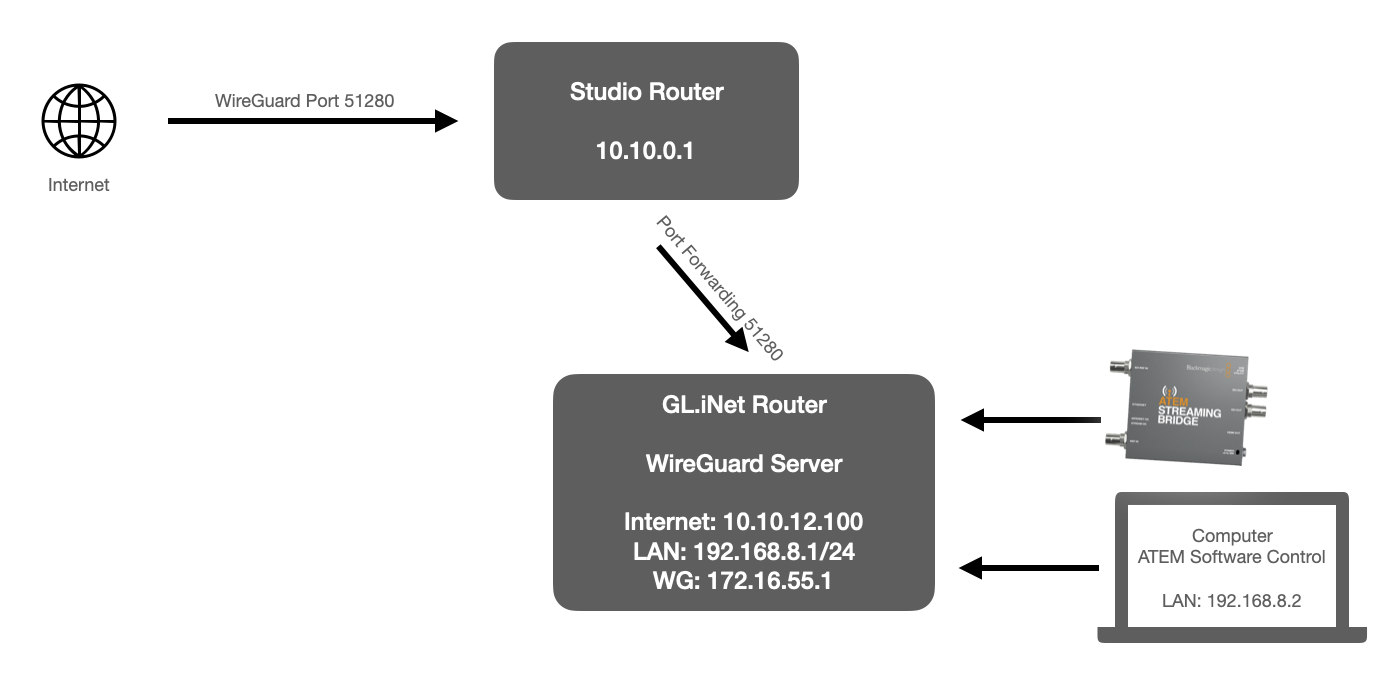
First we're going to set up the GL.iNet router as a Wireguard server.
Plug your computer in to one of the two ethernet ports on the right, or connect to its WiFi hotspot. There's a sticker on the bottom showing the default wifi name and password as well as the IP address of the router. (It's probably 192.168.8.1).
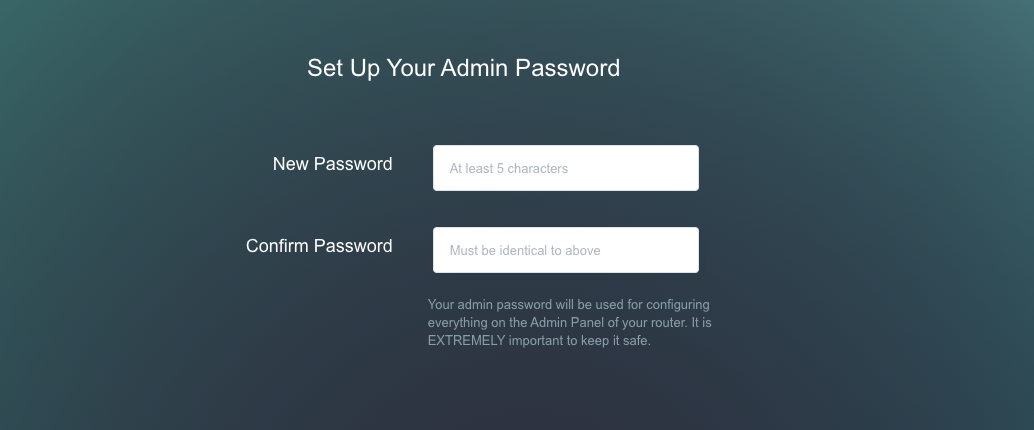
Open that address in your browser and it will prompt you to set up an admin password. Make sure you keep that somewhere safe like a password manager.
Set up Internet Access for the Travel Router
The first thing we need to do is get internet access set up on this router. You'll definitely want to hardwire this in to your studio network rather than use wifi. Plug an ethernet cord from your main router in the studio to the port on the left. Once that's connected, the admin dashboard should pop up a section to configure the wired connection. You can use DHCP to get it on your network. Eventually you'll want to give this device a fixed IP address by going into your main router and setting a static DHCP lease. The specifics of that will depend on your own router so I'll leave that up to you to look up.
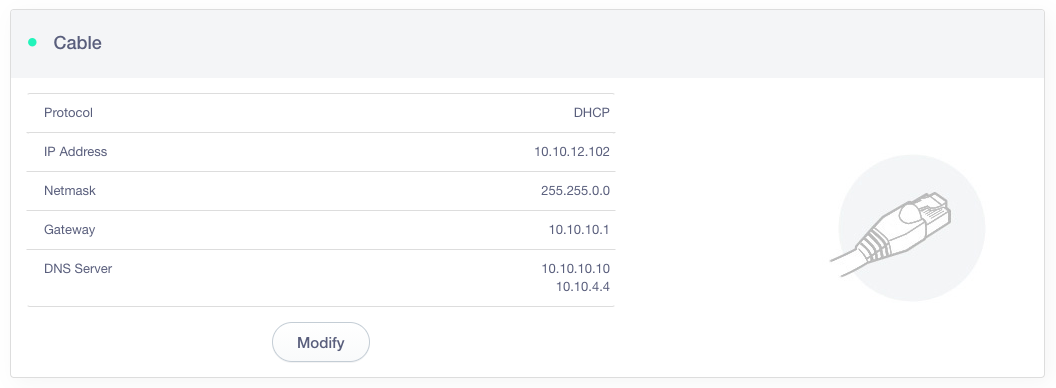
In my case the travel router's IP address is 10.10.12.102.
Configure the Wireguard Server
Now we're ready to set up the travel router as a Wireguard server. Wireguard is relatively new VPN software that is a lot faster and easier to use compared to older VPN software like OpenVPN. It's conveniently already built in to the travel router as well, making it an excellent option for this.
Go to the VPN menu on the side and expand it to reveal the Wireguard Server tab.
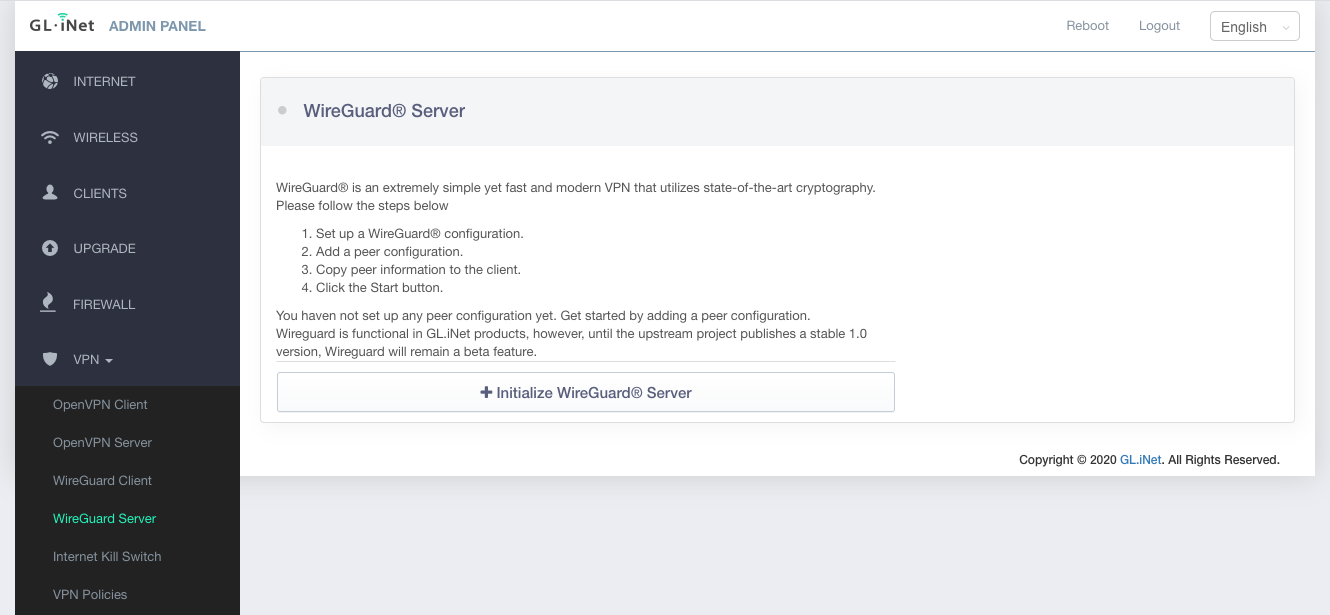
Click "Initialize Wireguard Server" and you'll be able to set it up. Enable the "Allow Access Local Network" toggle, and change the "Local IP" to 172.16.55.1. (It doesn't really matter what IP range you use for the Wireguard interface, but this address is unlikely to conflict with your existing network.)
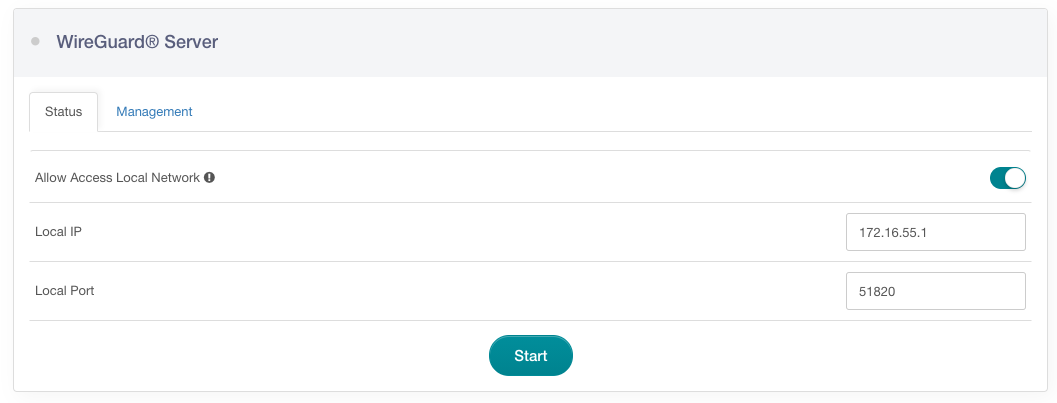
Now you can click "Start", and then go into the "Management" tab.
Click the big "Add a New User" button. Give it a name like "RemoteATEM". This will create a config for it which you'll use to set up the remote side.

Click on the icon under "Configurations" and click the "Plain Text" tab.

Copy that text into a text editor (not Word or Google Docs!). We're going to make a few changes to make it look like the below.
[Interface]
Address = 172.16.55.2/32
ListenPort = 42170
PrivateKey = <YOUR PRIVATE KEY>

[Peer]
AllowedIPs = 172.16.55.0/24, 192.168.8.0/24
Endpoint = <YOUR IP ADDRESS>:51820
PersistentKeepalive = 25
PublicKey = <YOUR PUBLIC KEY>
We don't want the ATEM to send the video feed over the VPN, so change the AllowedIPs line to: 172.16.55.0/24, 192.168.8.0/24. If it's set to 0.0.0.0/0 then all the traffic on the remote end will be funneled through your VPN server and your studio's internet connection. That's usually what you want when you're using a VPN for privacy, but we don't want to add latency to sending the video feed if you're streaming from the remote end to YouTube directly. The IP address in the Endpoint = line is the public IP address of your studio network, so make sure you leave that line alone. You can remove the DNS = line since we aren't routing all network traffic through the VPN. Make sure you keep the PrivateKey and PublicKey that your router generated though!
This next part is the magic that makes it work. The key here is we need to let other devices on the WireGuard server end access devices on the LAN side of the WireGuard client. The ATEM will be behind the WireGuard client (described in the next section), the ATEM itself wouldn't normally be visible to other things on the Wireguard server side.
Unfortunately this is the most complicated step. You'll need to edit a text file on the router by connecting to it via ssh. Open Terminal on a mac, or PuTTY on Windows.
ssh root@192.168.8.1
The root ssh password is the same admin password you created when you first set up the router. (You won't see your keystrokes as you're typing your password.)
You'll need a text editor to edit the file. If you're familiar with vi, it's already installed. If you want something easier to use, then you can install nano.
opkg update
opkg install nano
Now you can edit the file using nano:
nano /etc/config/wireguard_server
Navigate to the bottom of the file and add this line:
list subnet '192.168.5.0/24'
The file should now look something like the below
config servers
        option local_port '51820'
        option local_ipv6 'fd00:db8:0:abc::1'
        option private_key '<YOUR PRIVATE KEY>'
        option public_key '<YOUR PUBLIC KEY>'
        option access 'ACCEPT'
        option local_ip '172.16.55.1'
        option enable '1'

config peers 'wg_peer_9563'
        option name 'RemoteATEM'
        option client_key '<CLIENT PUBLIC KEY>'
        option private_key '<CLIENT PRIVATE KEY>'
        option client_ip '172.16.55.2/32'
        list subnet '192.168.5.0/24'
To save and exit, press control X, and press Y and enter when prompted. You'll need to reboot this device once this is set up, so click the "reboot" button in the top right corner of the admin panel.
Set Up Port Forwarding
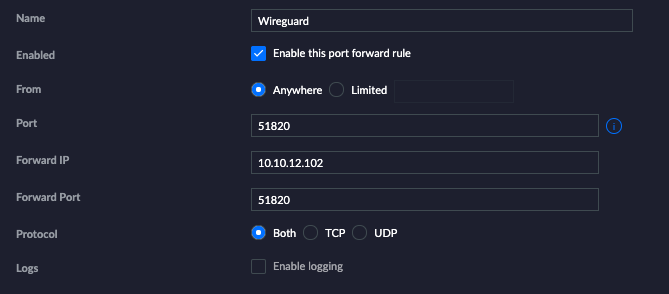
The last step on the studio side is to set up port forwarding from your studio router to forward port 51820 to the IP address of the WireGuard server. This is what will let the remote end be able to connect to your studio VPN. How you do this will depend on what router you use in your studio. Most routers will have a web interface to configure them which will let you set up port forwarding rules.
You'll need to know the IP address of your studio router as well as the IP address of the travel router. Create a port forwarding rule to forward port 51820 to your travel router's IP address.
For example, this is what it looks like in my Unifi router to create the forwarding rule.
Alright, we're set on this end! You now have a WireGuard server accessible from outside of your network! If you're curious to keep experimenting with WireGuard, you can even set up your mobile phone or laptop as a WireGuard client so that you can connect back to your studio on the go!
Next, we're ready to set up the remote end for the ATEM Mini Pro.
Set up the Remote Side for the ATEM
The remote kit side will have the ATEM Mini Pro, the camera, and the WireGuard client.
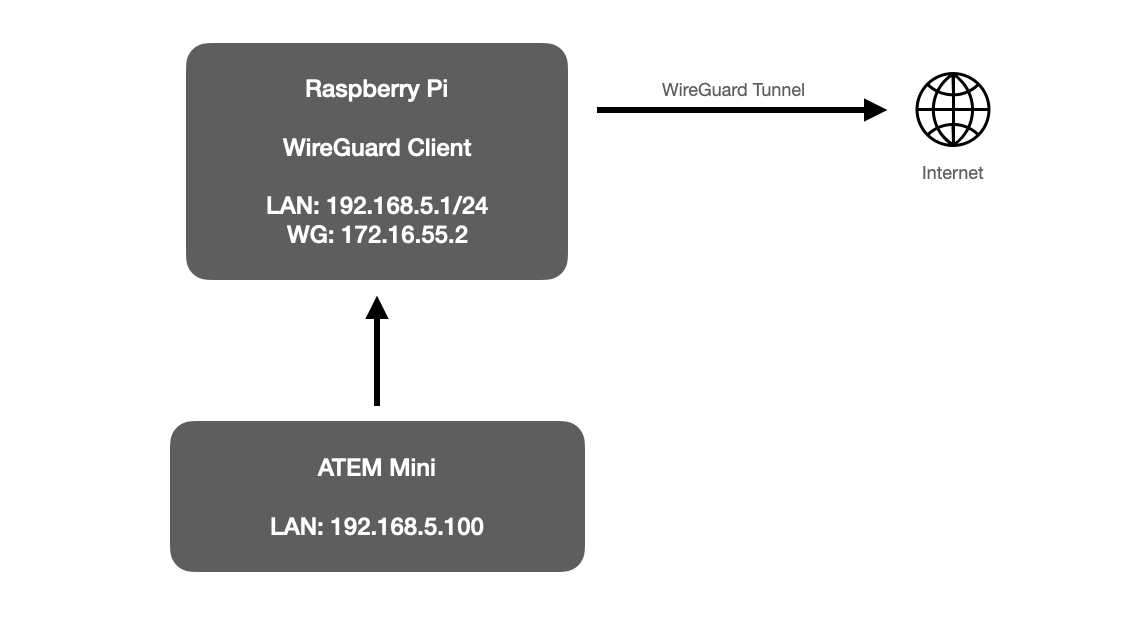
When the WireGuard client powers on, it will connect to your studio network and make the ATEM Mini acessible from your studio network.
I want to preface this section by saying I tried really hard to make this work with another GL.iNet router, but ran into a few blockers before switching to using a Raspberry Pi. As such, this step is a lot more involved and requires quite a bit more command line work than I would like. If you are reading this and happen to know how to do this with the GL.iNet router instead, I would be very interested in hearing it! Feel free to get in touch with details!
Install Raspberry Pi OS
The first thing to do is burn the Raspberry Pi OS image to a MicroSD card. Download the Raspberry Pi Imager app, and go through the steps of installing the Raspberry Pi OS. If you're comfortable on the command line, you can use the "lite" version which doesn't include the desktop environment. I prefer this since I'm never going to be connecting a monitor to this anyway after the first round of setup.
After the card is created, stick it in the Raspberry Pi and turn it on. You'll need a keyboard and monitor connected to set things up the first time. You'll also want to make sure the Raspberry Pi has an internet connection, so plug in an ethernet cord to the ethernet port on the Pi into your home router.
Install WireGuard
It looks like in the near future, WireGuard will be included by default in Raspberry Pi OS, so first check if it's already there by typing which wg, and if it shows you a path like /usr/bin/wg then you can skip this step since it's already installed!
If you need to install WireGuard, you can install it from the "testing" packages by running these commands:
echo "deb http://archive.raspbian.org/raspbian testing main" | sudo tee --append /etc/apt/sources.list.d/testing.list
sudo apt update
sudo apt install -y wireguard
Now when you run which wg you should see that it's installed.
WireGuard Setup
Remember that big block of text you created in the previous step? It's time to use it! You'll need to paste that into the WireGuard configuration file on the Raspberry Pi.
sudo nano /etc/wireguard/wg0.conf
Paste in the full contents of the configuration replacing anything that is already in that file if any.
[Interface]
Address = 172.16.55.2/32
ListenPort = 42170
PrivateKey = <YOUR PRIVATE KEY>

[Peer]
AllowedIPs = 172.16.55.0/24, 192.168.8.0/24
Endpoint = <YOUR IP ADDRESS>:51820
PersistentKeepalive = 25
PublicKey = <YOUR PUBLIC KEY>
Save and quit by pressing control X, then Y and enter when prompted.
Turn the Raspberry Pi into a Router
The Raspberry Pi will be sharing its internet connection with the ATEM Mini, so it's time to turn it into a router! (This is the reason I wanted to use a travel router instead, because this step is already done in that case.)
First, plug in the USB ethernet adapter to one of the USB ports, and connect an ethernet cable from that to the ATEM Mini.
Now we need to set up that ethernet device. Edit the file using the command below:
sudo nano /etc/network/interfaces.d/eth1
Paste in the following text exactly as written:
auto eth1
iface eth1 inet static
        address 192.168.5.1
        netmask 255.255.255.0
This creates a new network on the Raspberry Pi which will be the private network for the ATEM Mini.
We're going to set up a few more things first, then eventually reboot the Raspberry Pi.
sudo apt update
sudo apt install -y isc-dhcp-server firewalld
Now edit the DHCP server config file:
sudo nano /etc/dhcp/dhcpd.conf
You'll need to set the domain-name and domain-name-servers as follows:
option domain-name "rpi.local";
option domain-name-servers 1.1.1.1, 8.8.8.8;
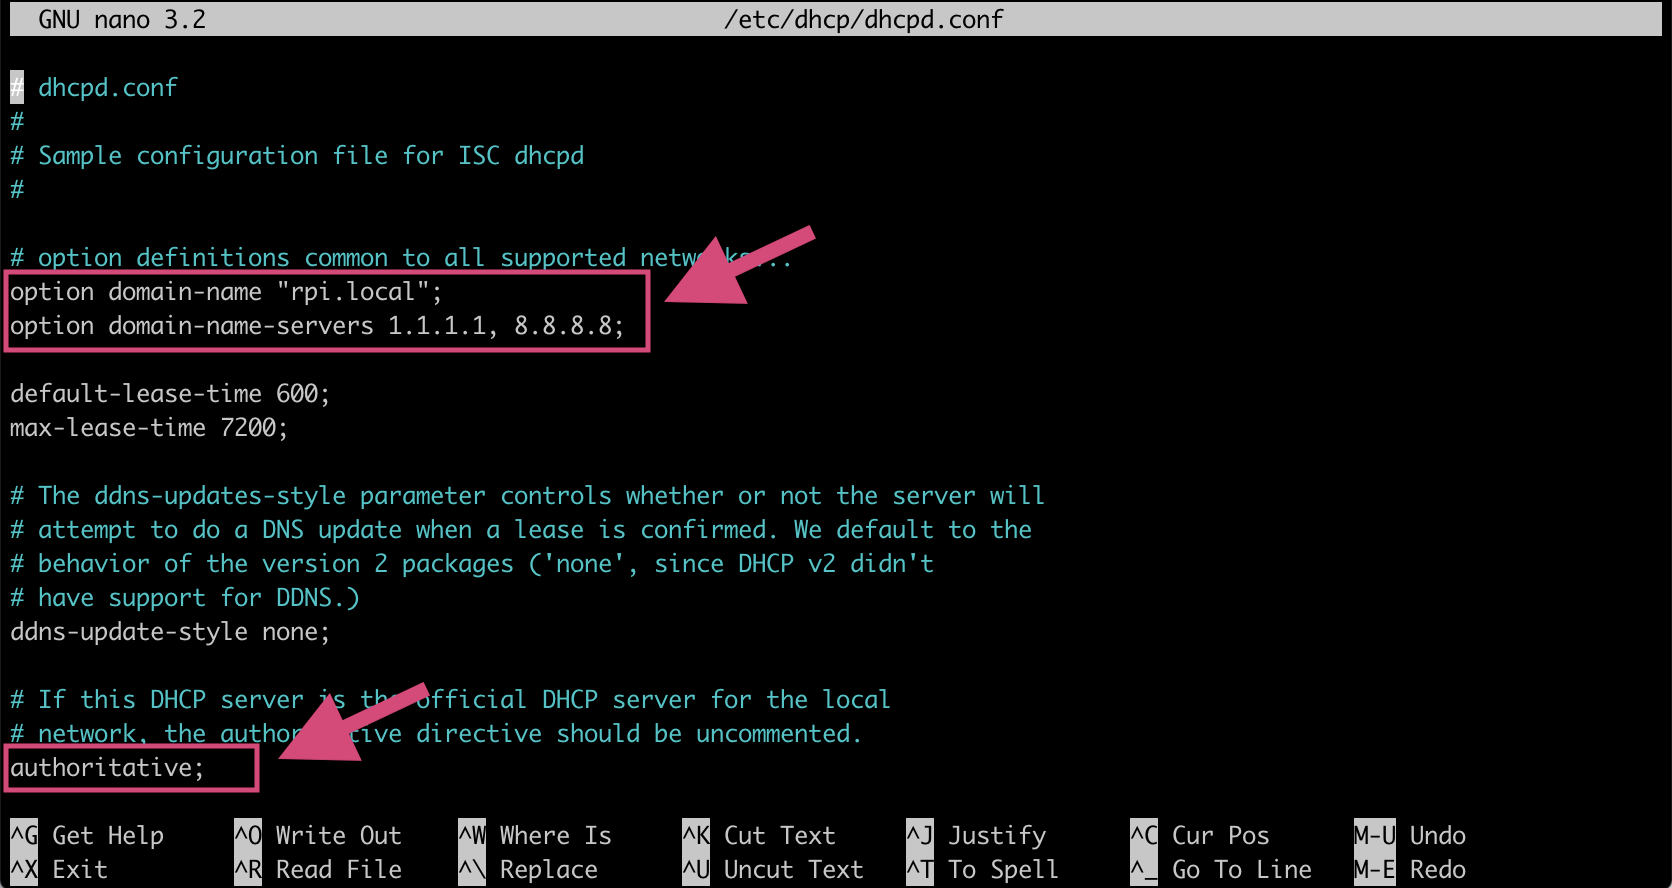
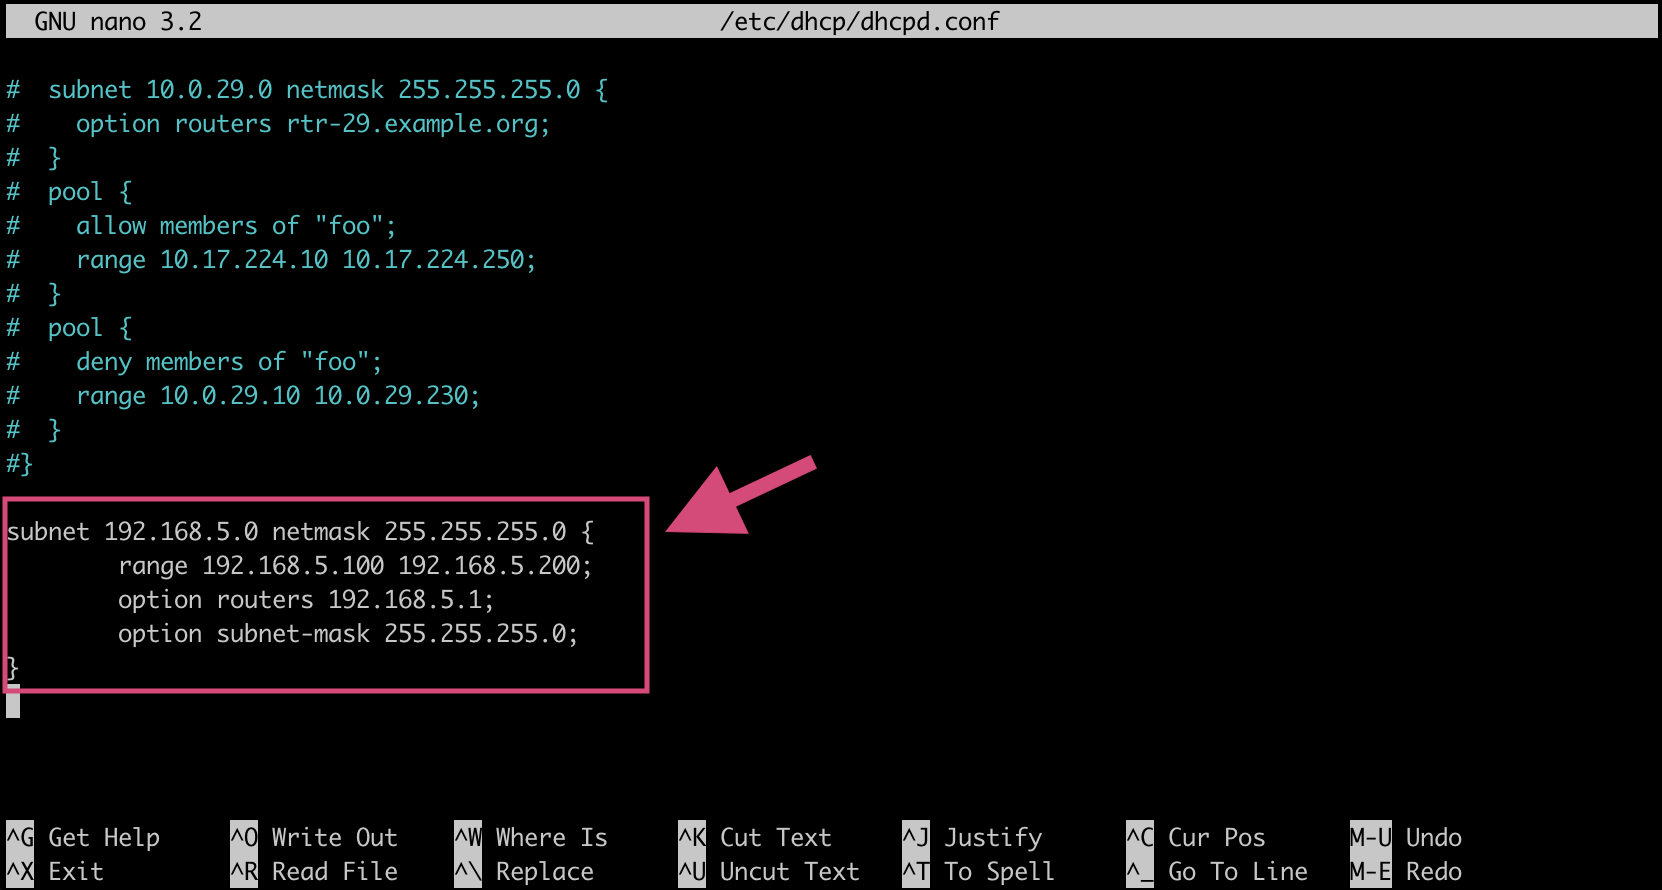
Scroll down to the bottom and add the following lines as well:
subnet 192.168.5.0 netmask 255.255.255.0 {
        range 192.168.5.100 192.168.5.200;
        option routers 192.168.5.1;
        option subnet-mask 255.255.255.0;
}
Next, open the /etc/default/isc-dhcp-server file:
sudo nano /etc/default/isc-dhcp-server
Add eth1 to the INTERFACESv4 line and save the file.
INTERFACESv4="eth1"
INTERFACESv6=""
Now we can set up the firewall to allow this traffic through and enable IP masquerading.
sudo firewall-cmd --add-service=dhcp --permanent
sudo firewall-cmd --add-masquerade --permanent
Lastly, we'll tell the WireGuard client to start up on boot by typing:
sudo systemctl enable wg-quick@wg0
Finally, we're ready to reboot the Raspberry Pi and see if it all works!
sudo reboot
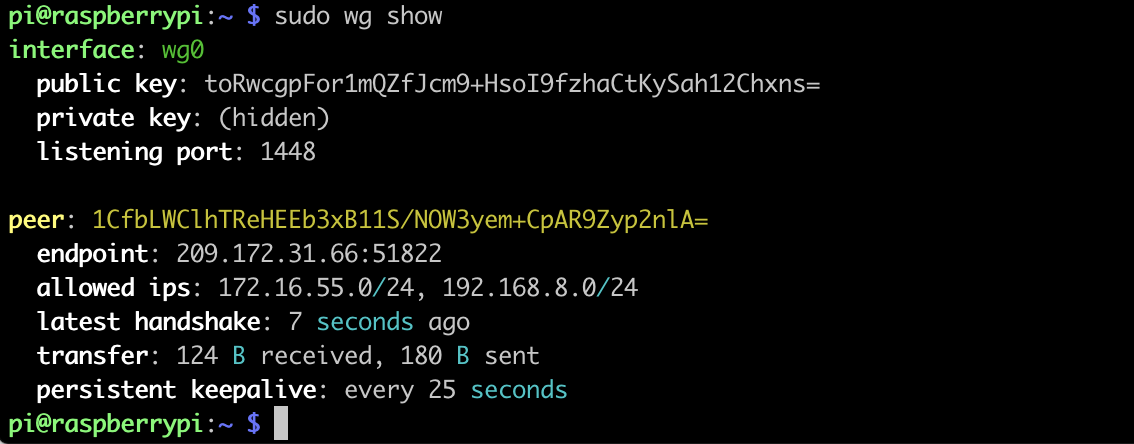
With any luck, the Raspberry Pi will boot up and connect to your WireGuard server and everything will be working!
On the Raspberry Pi, you should be able to type sudo wg to see the status of the WireGuard client. If it worked, you'll see the endpoint you're connected to as well as a "latest handshake" and some transfer stats showing how much data has gone over the VPN.
Let's Try it Out!
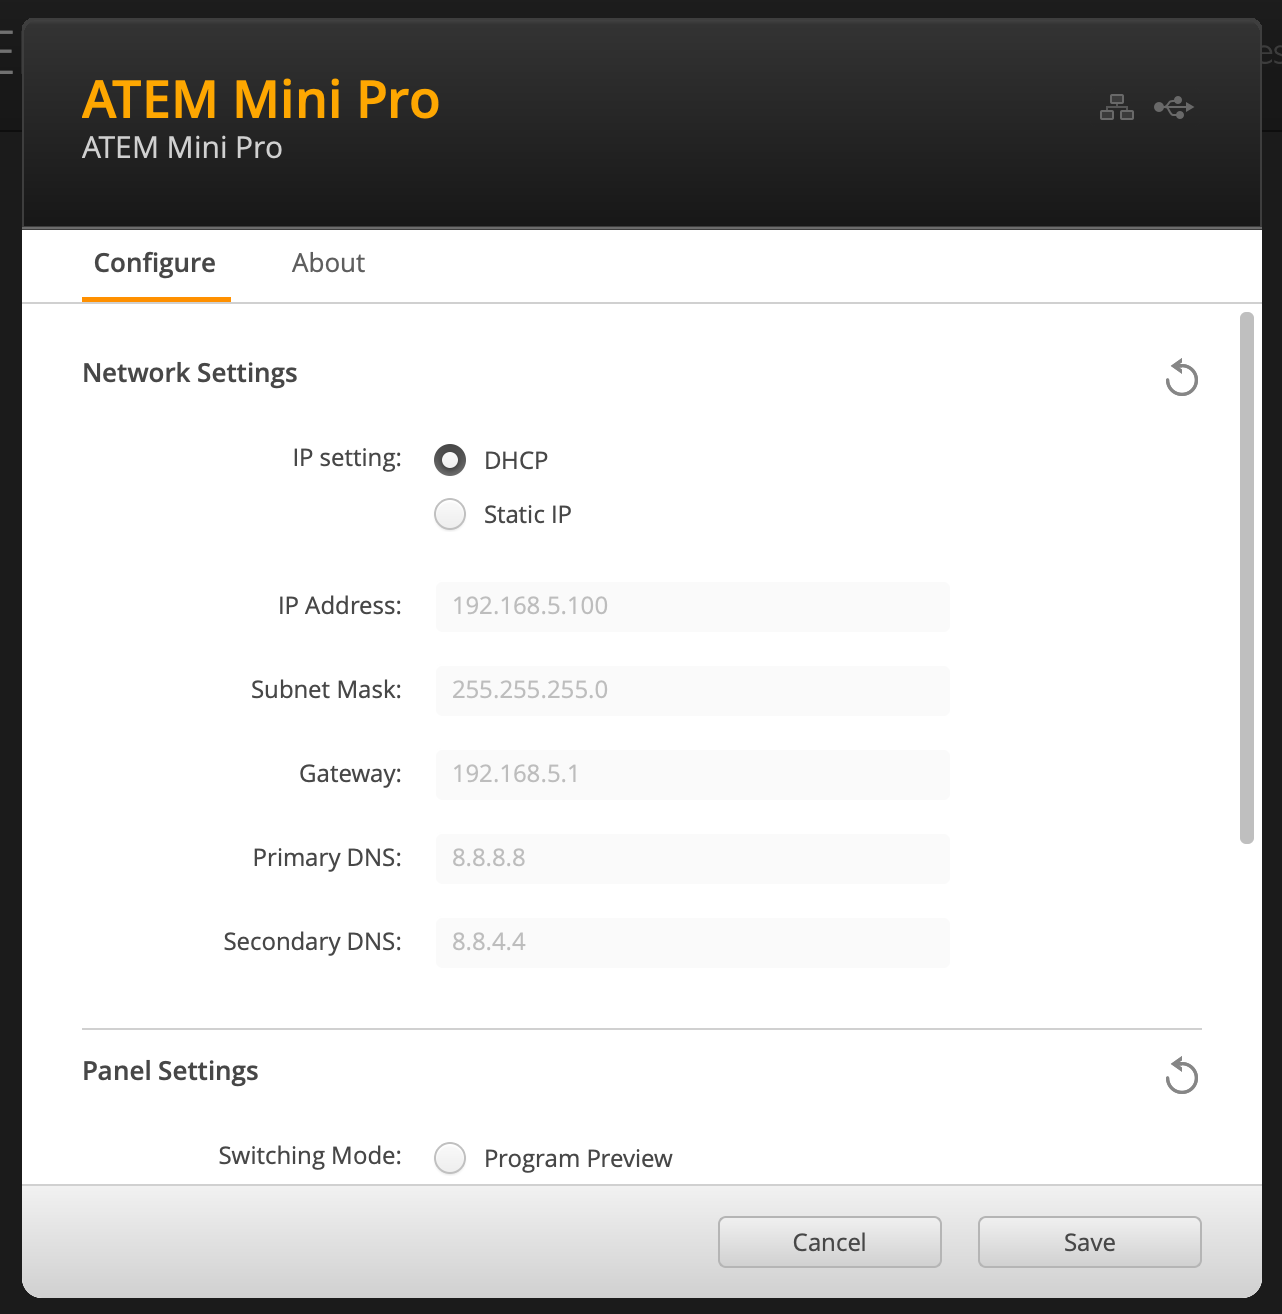
With everything up and running, it's time to try to connect to your ATEM! You'll need to find or set the IP address of the ATEM on the remote side. You can try out 192.168.5.100 since it will be the first device that the DHCP server sees, or you can connect your ATEM over USB and use the ATEM Setup app to find the address.
Of course, to really put it to the test, you'll want to unplug from USB and see if you can connect from your laptop through the VPN.
Remember, at this point your laptop running the ATEM Software Control app should be connected to your travel router either over wifi or ethernet. Your ATEM Mini is the remote end, and that's connected to the Raspberry Pi.
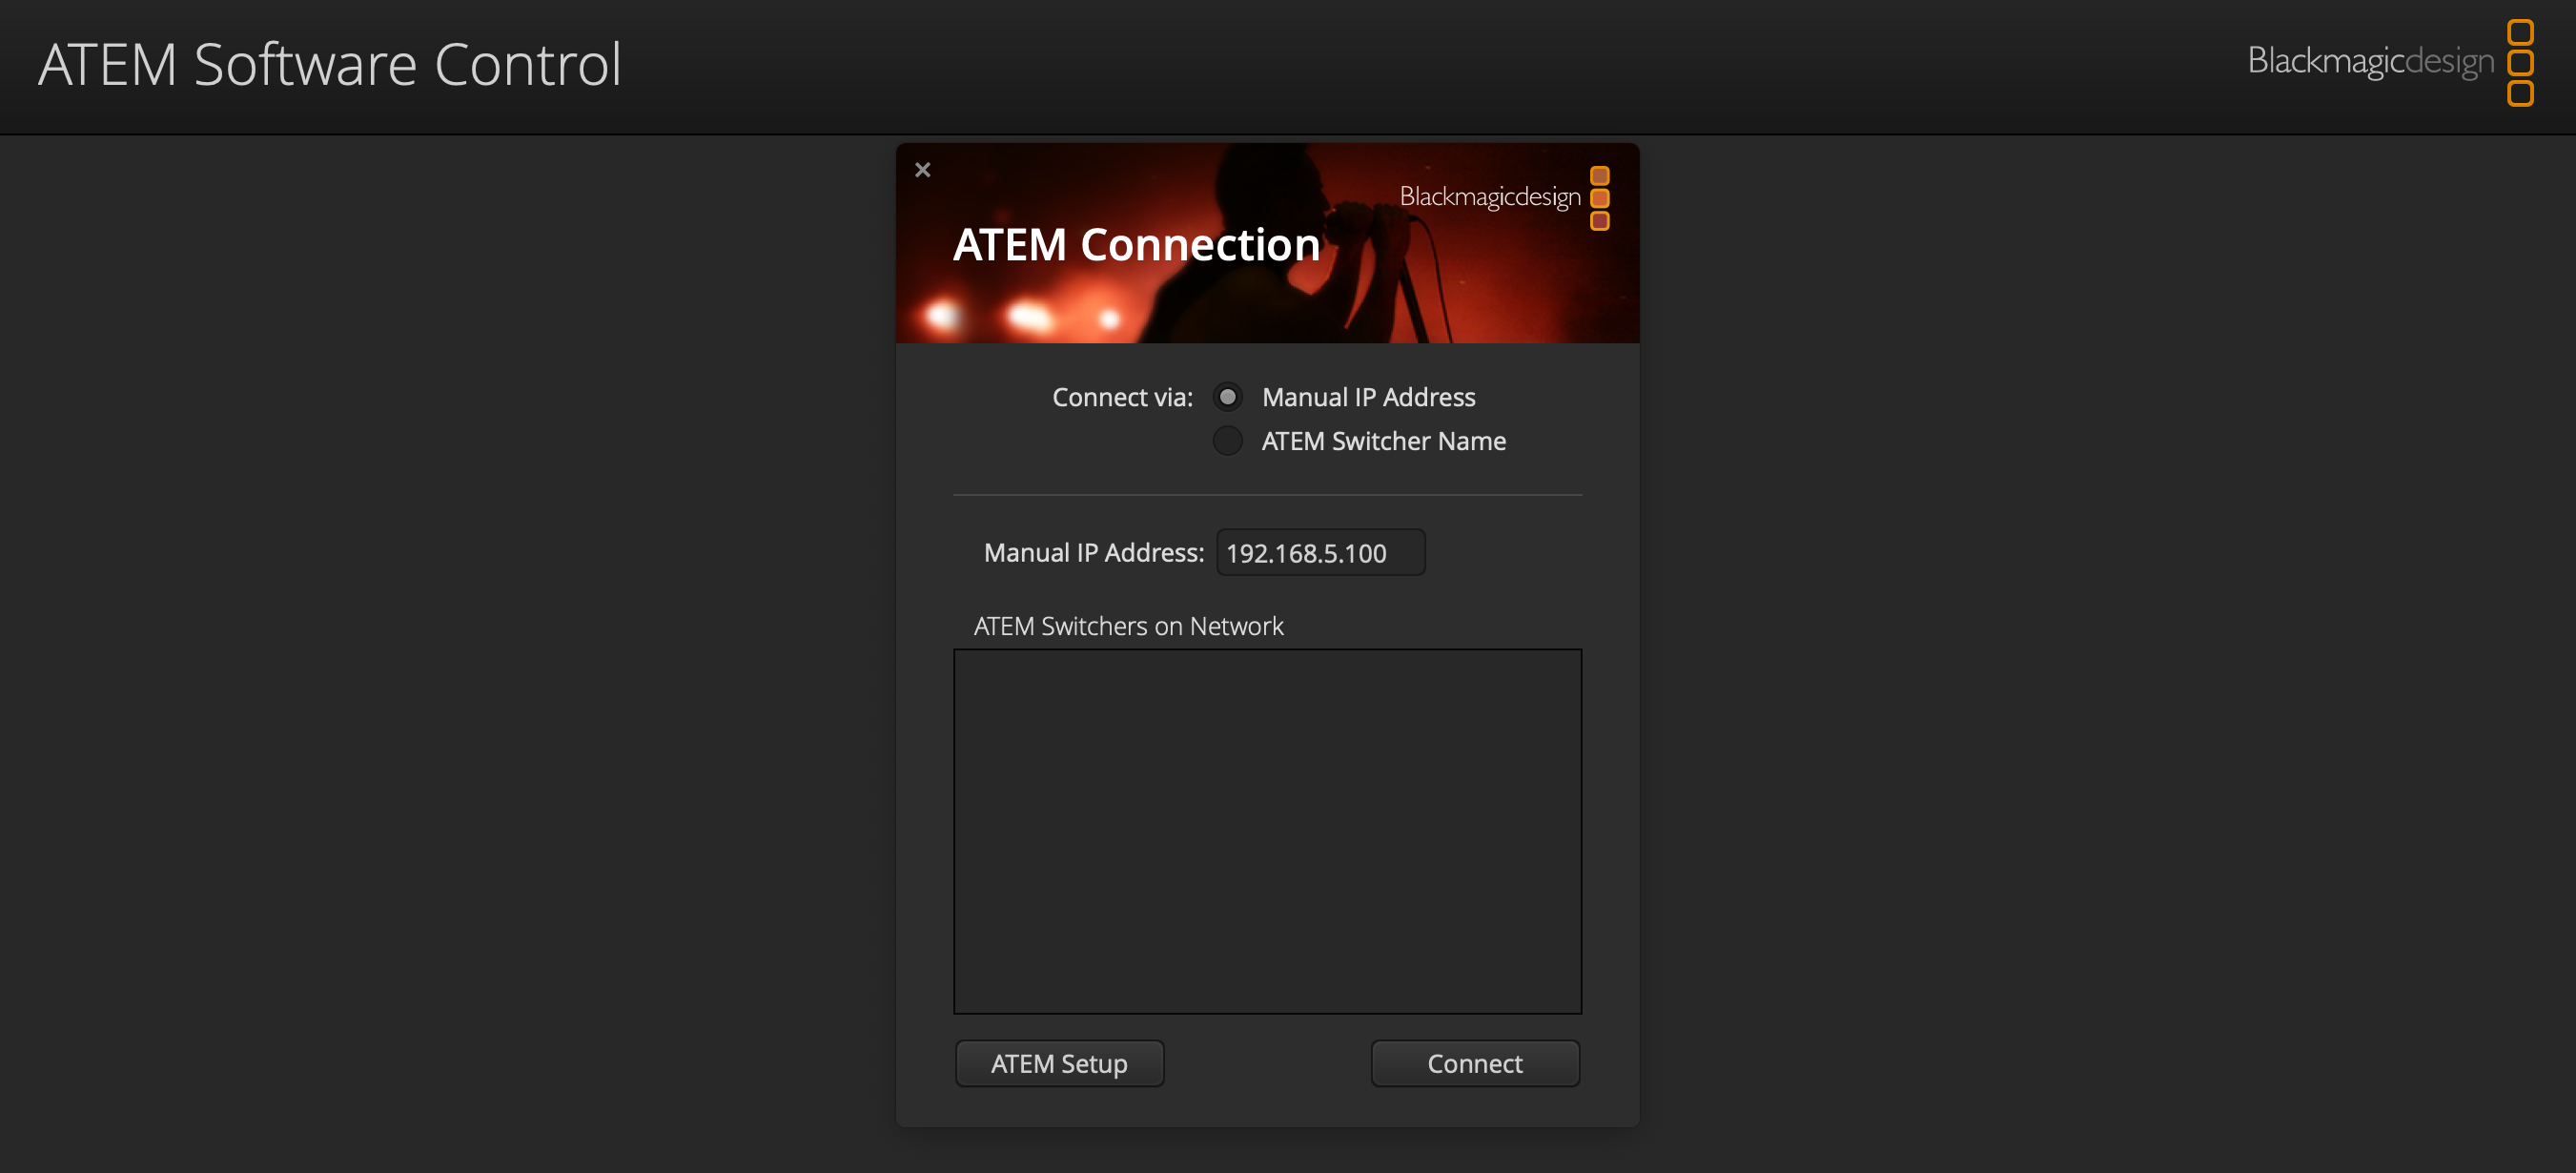
Open the ATEM Software Control app and type in the ATEM's IP address under "Manual IP Address". (It won't be able to auto-discover it on the network since it's going over a VPN.)
If you have a Blackmagic camera connected to the ATEM, you'll be able to control it from the Camera tab since it's connected to the ATEM via HDMI! No networking stuff to worry about there.
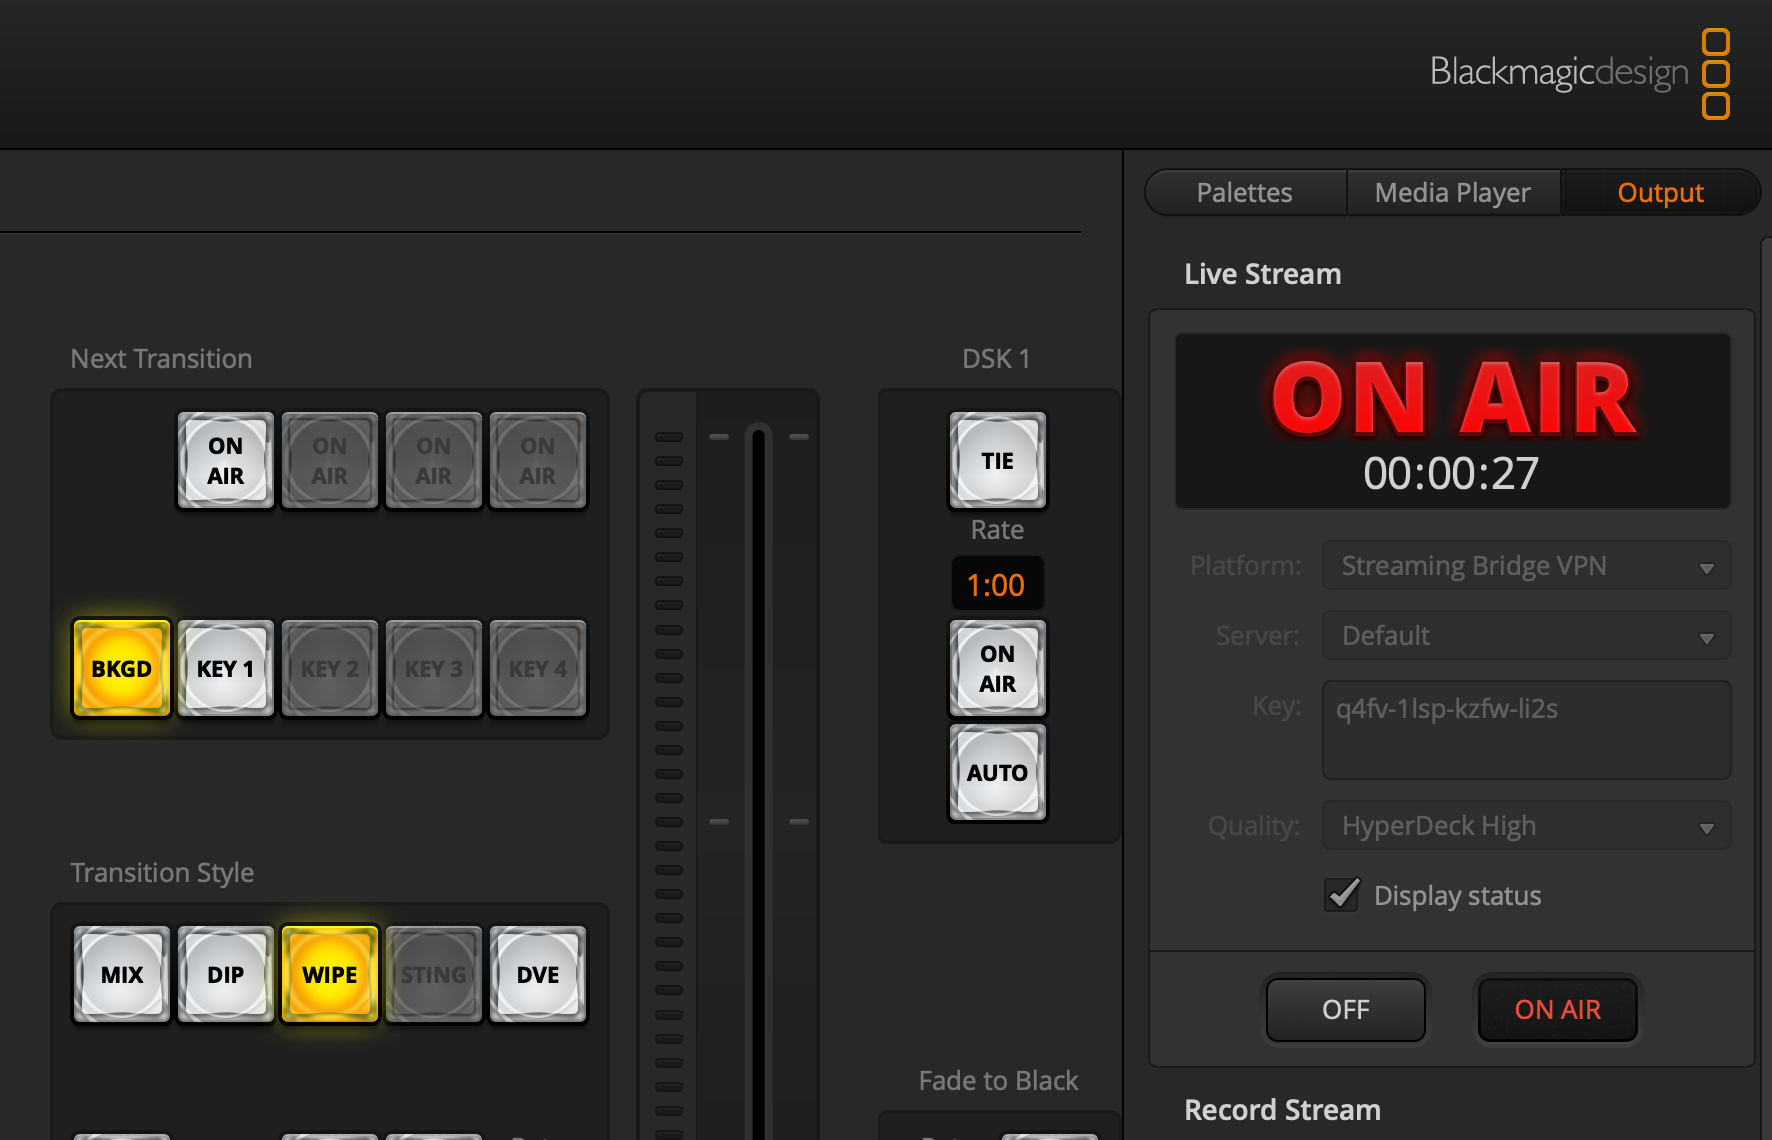
Using the Streaming Bridge
Now you're ready to choose where to stream! The remote ATEM can stream directly to YouTube if that's how you're using it. Because of the way we set up WireGuard, the ATEM will use the remote end's internet connection rather than sending the video through the VPN and out of your studio. That saves a hop and will give you better performance.
If you want to stream to your Streaming Bridge, that should "just work" by using the local IP address of the Streaming Bridge. Connect the Streaming Bridge to your travel router, then open the ATEM Setup app to find its IP address. In my case it's 192.168.8.127.
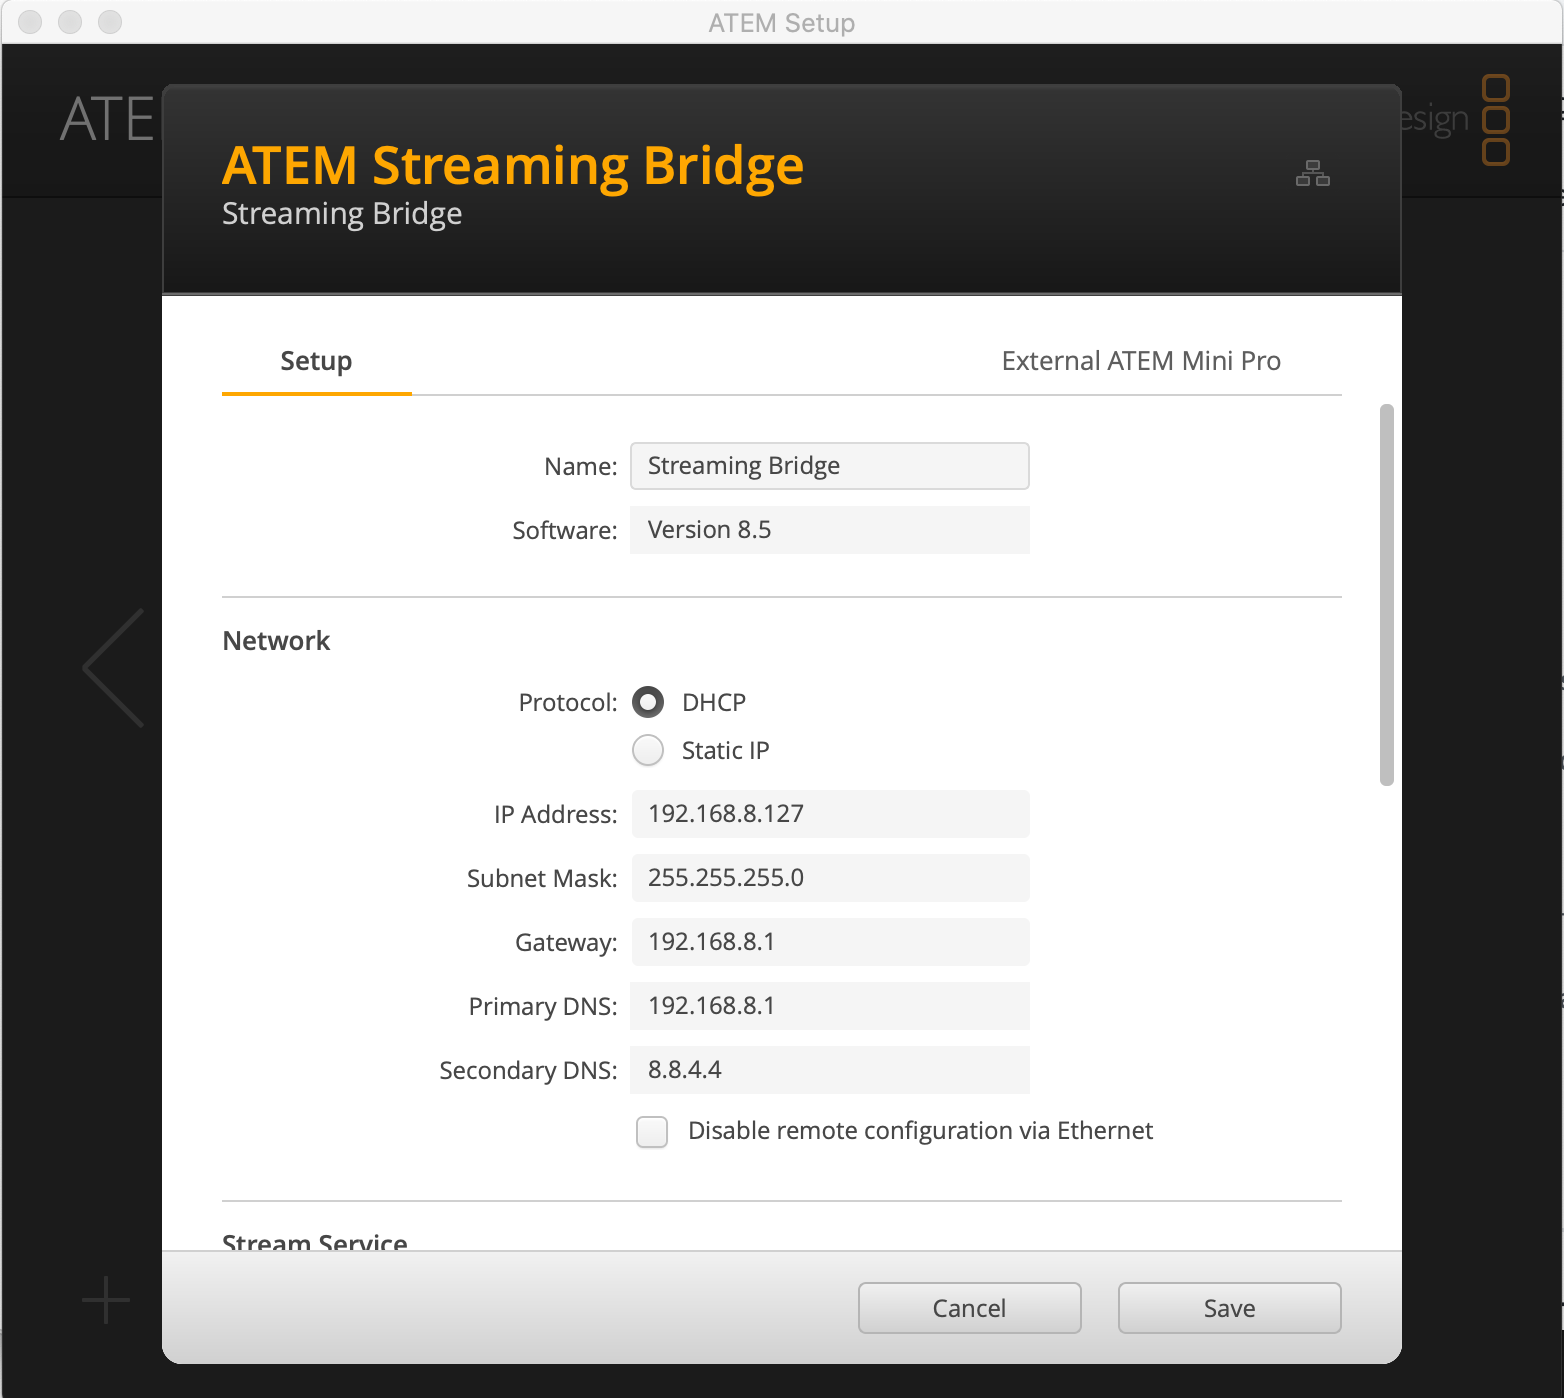
Scroll down and choose "Local network with key". It's a "local network" because it's going over the VPN. The nice thing about doing it this way is you don't have to set up port forwarding in your studio's router to the bridge, since it will all happen over the VPN!
Next click the "External ATEM Mini Pro" tab to export the configuration file.

You'll need to make one change in the file since the normal local network discovery that it does won't work over the VPN. Open the xml file in a text editor like TextEdit or Notepad, and replace the URL with the IP address of your Streaming Bridge, for example:
<servers>
  <server>
    <name>Default</name>
    <url>rtmp://192.168.8.127:1935/app</url>
  </server>
</servers>
Now you can load that config file in the ATEM Software Control from the "Stream" menu in the top menu bar, and you'll have a new streaming destination to choose!
Recording Locally
If you also ship a USB drive plugged in to the remote ATEM, you can record the program locally as a backup! If you use a Blackmagic Pocket Cinema Camera 4K, you can even tell the camera itself to record a high quality video to an SD card or SSD in the camera itself!
And that's it! Hopefully all of this worked for you. If you have any trouble, feel free to post a question on the Live Video Tech forums to get some assistance!
Follow me on YouTube for more tips and tricks about livestreaming, video production, and the ATEM Mini!