Here is a writeup of how I built a desk bell for Kickstarter pledge alerts using a Raspberry Pi Zero and a solenoid.
First, the design goals:
- The bell should look as much like a regular desk bell as possible, no loose wires, and no visible contraption that rings the bell
- Should be entirely self-contained and not rely on external hardware or cloud services
- Should be able to be battery powered so that I can take it places
With that in mind, I set out to find the hardware I needed for this, and settled on the following.
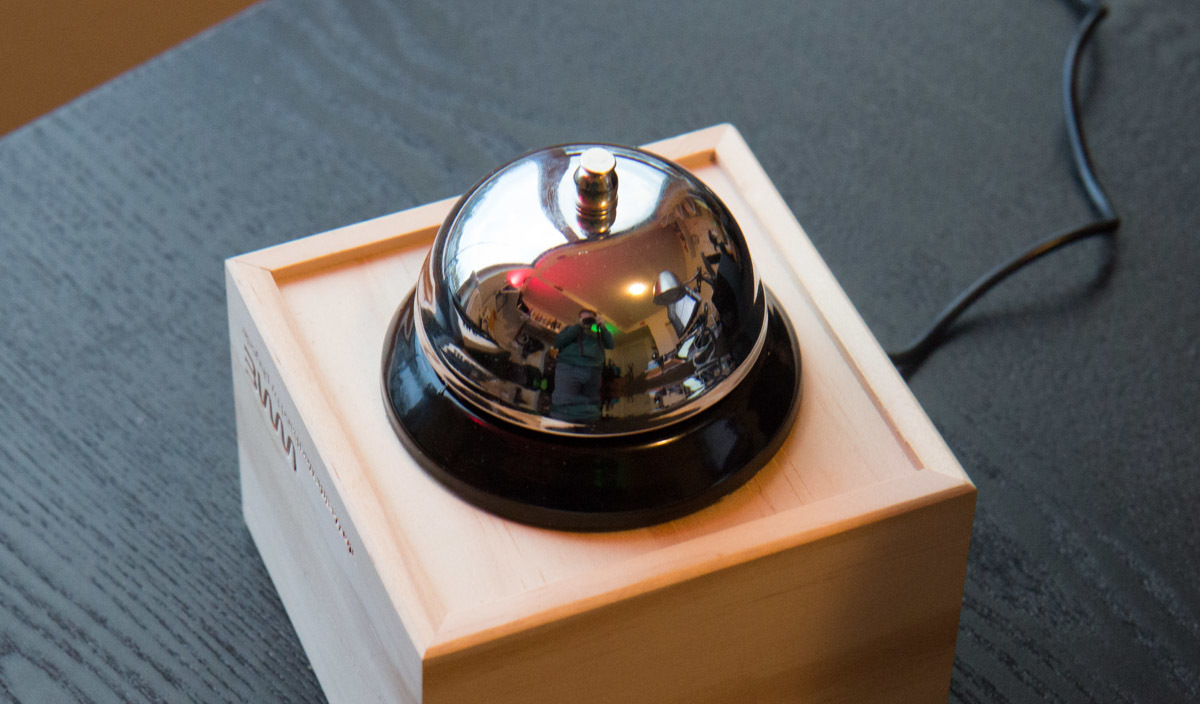
The Bell
The bell is a traditional mechanical desk bell. I bought it on Amazon for $5.29. When you press the button on the top, it hits a little hammer that then hits the inside of the bell. This will make more sense in a later photo.
The Hardware
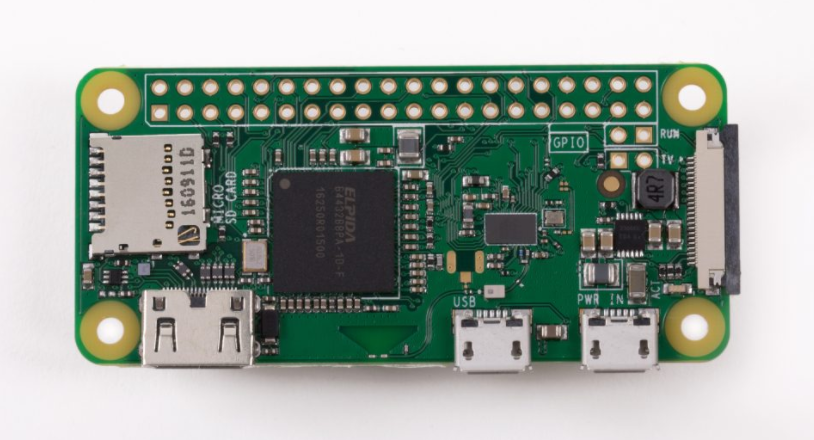
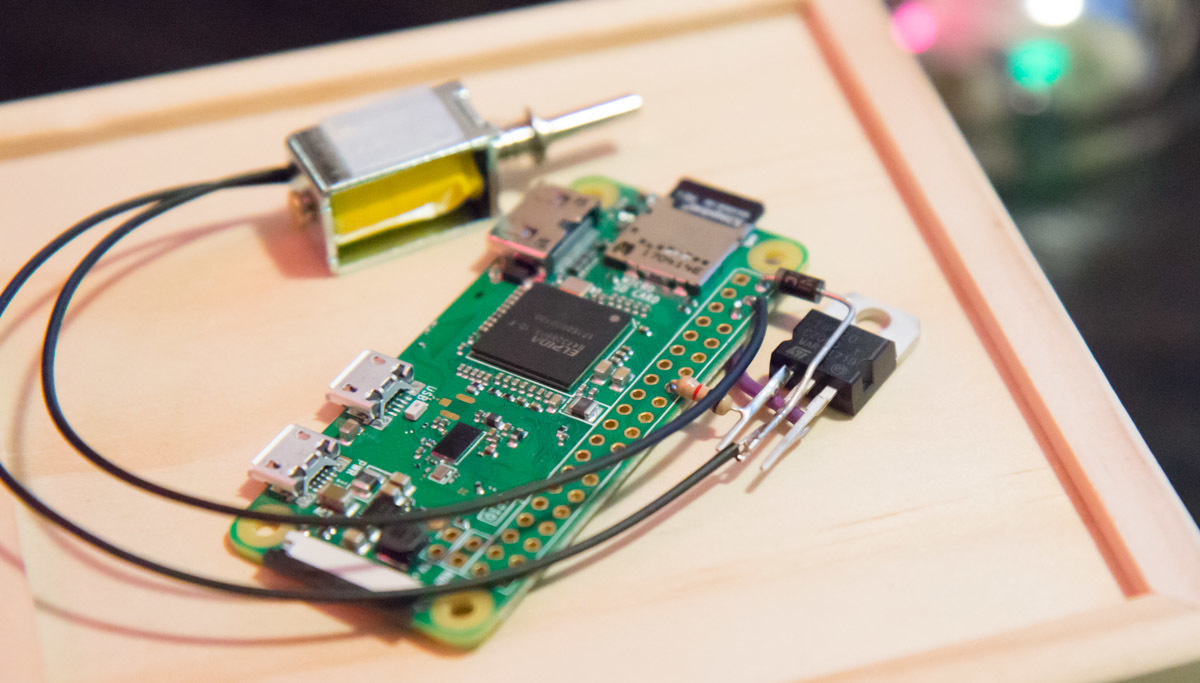
It turns out a Raspberry Pi Zero fits perfectly under the bottom part of the desk bell. The Pi Zero has built-in wifi, and can be powered by a portable USB battery, so it's a great choice for this.
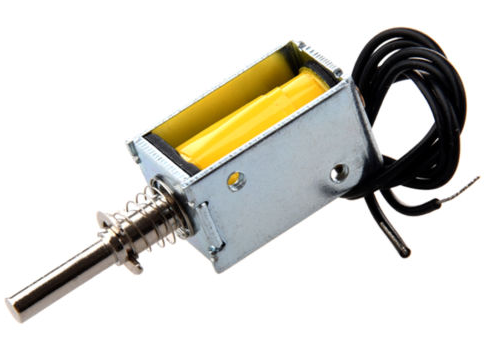
The next piece was figuring out how to move the hammer inside the bell. I started looking on eBay and Aliexpress for cheap solenoids, and was quickly overwhelmed with options. However I needed to find one that worked on 5v or 3.3v since that's what the Pi Zero can output, and I don't want to require an additional external power supply. I also realized that there are some solenoids that have springs that force the pin back to a resting position, and others will just stop applying the magnet and the pin can move freely when it's "off". What I needed for this is one with a spring so that the pin snaps back and gets out of the way of the hammer in the bell. I took a gamble buying one on eBay that I thought matched all the criteria, but it was kind of hard to tell because the descriptions are not written in the best English. Here's the one I ended up with.
The hardest part of this whole thing, since I'm not actually super great at electronics, was figuring out how to drive the solenoid from the Raspberry Pi's GPIO pins. I know you can't just use the 5v output to drive it directly, since that's a quick way to damage the Pi's pins. You need a circuit in between with a transistor and diode to protect the Pi.
The Circuit
With a bit of research, I found this circuit diagram for driving a solenoid from an Arduino, which is effectively equivalent to what I need to do. I've redrawn it here based on the actual components I used, and using the Raspberry Pi's 5v power instead of an external power supply.
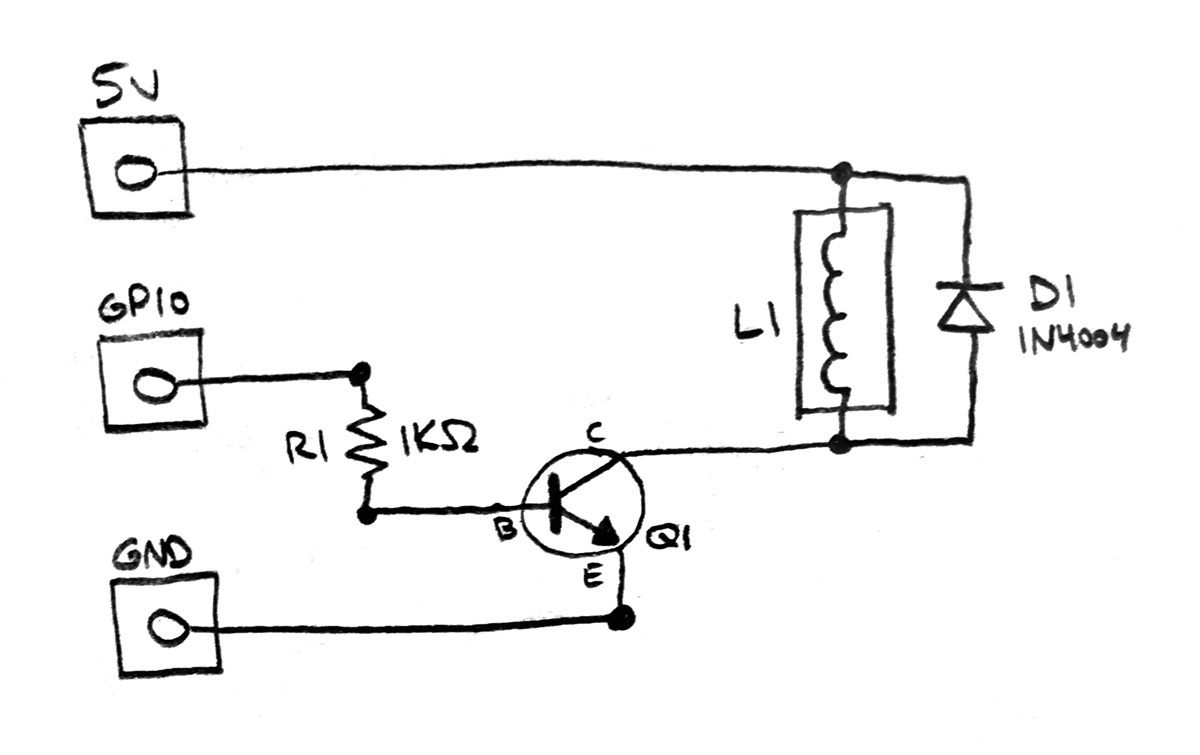
Components:
- R1: 1KΩ resistor
- D1: 1N4004 Diode
- Q1: TIP120 Darlington NPN Transistor
- L1: 5V Solenoid
I happened to have a 1N4004 diode and 1KΩ resistor in my collection of parts, but I had to buy the TIP120 Darlington Transistor from Adafruit. Since I'll only be actuating the solenoid for a split second, I didn't worry about adding a heat sink to the transistor since it will only be on for a very short period of time.
Refer to the Pi Zero pinout diagram to know which GPIO pin you're connecting to. In my photos above, that's pin 16 which is GPIO pin 4.
Soldering
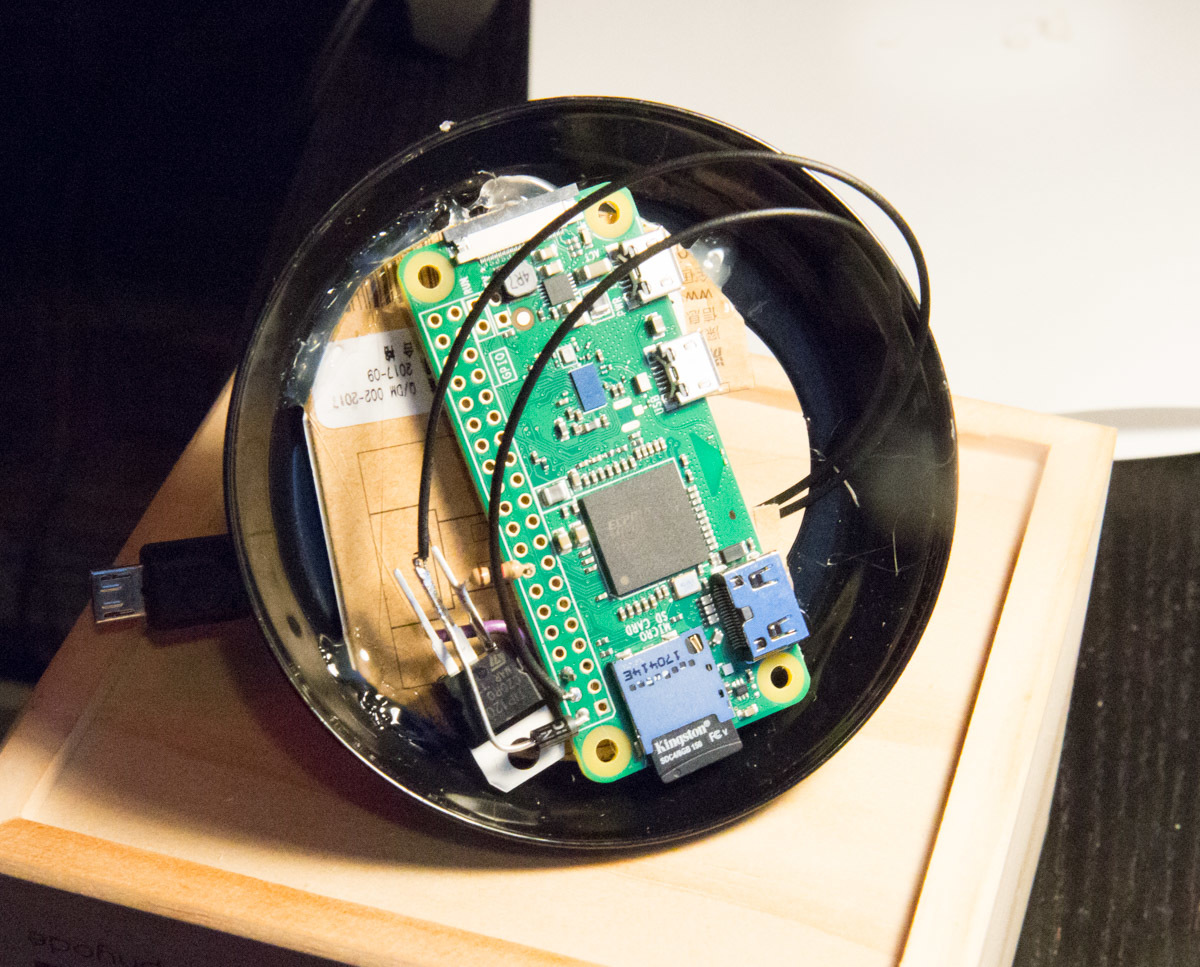
Since I need this whole thing to fit inside the bell, that doesn't leave room for adding any additional circuit boards. I decided to solder directly on to the Pi Zero, despite that not being a thing I'd normally do. Thankfully it's cheap enough that if I mess it up super bad it's not the end of the world if I have to buy another one.
The leads on the diode were thick enough to act as a sort of structural support for hanging the components off of the Pi. I tried to keep everything as tight as I could while also keeping it flat.
Assembly
The first step of putting this all together was mounting the solenoid so that it can hit the hammer when it's actuated. I cut out a little piece of cardboard and hot-glued the solenoid to it, and the cardboard to the underside of the bell.
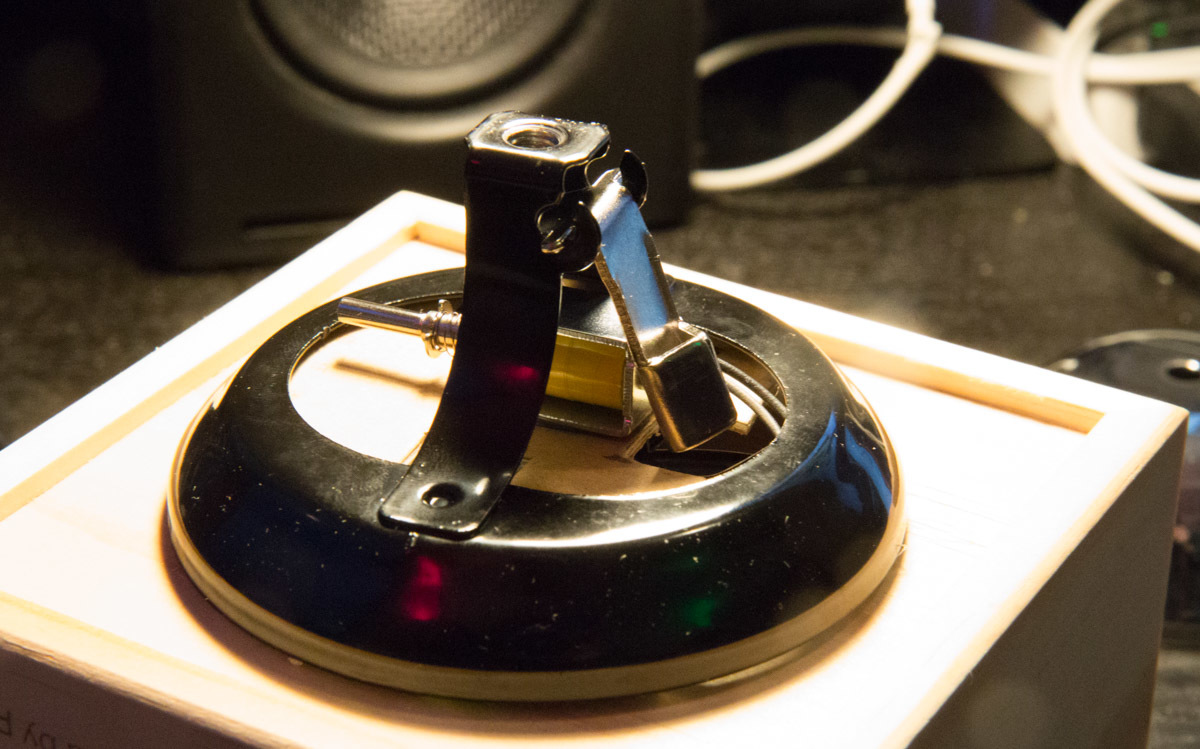
Then I attached the Pi board to the underside, hot gluing it to the frame in a couple places. It just barely fit with the added width of the transistor hanging off, once you factor in the size of the micro USB connector also plugged in.
The wooden box is where the battery lives, so I drilled a hole for the USB cable in the top of the box. This lets the bell site nicely on the top of the box without any visible wires. When it's running off the battery, there's no visible wires at all, since everything is entirely self-contained.
The Software
Since the Raspberry Pi is a full Linux computer, we can use a high-level language to parse the Kickstarter feed and ring the bell. Here's what I did to get the Pi set up with the software I needed.
After first configuring the wifi by plugging in a physical keyboard and monitor and enabling SSH, I was able to then SSH from my laptop to install the rest.
System packages:
sudo apt install apache2 php git-core
WiringPi provides a command line utility to control the GPIO pins. To install, clone the git repository and run the build command.
git clone git://git.drogon.net/wiringPi
cd ~/wiringPi
./build
This will compile and install the gpio command, which you can then use to configure the pins.
First we'll make an init script to set the pin to output mode and run that on boot. Open the /etc/rc.local file in an editor and add the following, which sets pin 4 to output mode:
/usr/local/bin/gpio mode 4 out
Next, make a file called ding.sh and add the following, which will turn the pin to HIGH, wait a split second, then turn it to LOW.
#!/bin/bash
/usr/local/bin/gpio write 4 1
sleep 0.05
/usr/local/bin/gpio write 4 0
Make the script executable:
chmod 755 ding.sh
Now you should be able to run this script and hear the bell ding!
./ding.sh
At this point, you can trigger this bell from anything you can use to call a shell script!
Kickstarter
Since the main goal of this project is to be alerted when someone pledges to a Kickstarter campaign, we'll set up a small script to check the campaign stats and run the "ding" script whenever the total pledge amount changes.
The trick to this is that Kickstarter has a JSON endpoint that returns the basic campaign info used to update the stats on a campaign page. Take your Kickstarter URL and add /stats.json?v=1 to the end, and you'll see a response like the below.
{
  "project": {
    "id": 1330436901,
    "state_changed_at": 1507653791,
    "state": "live",
    "backers_count": 307,
    "pledged": "10352.0",
    "comments_count": 7
  }
}
The PHP script below will download that file, compare the pledge amount to what it last saw, and run the script to ring the bell whenever it changes.
<?php
chdir(dirname(__FILE__));
$date = new DateTime();
$date->setTimeZone(new DateTimeZone('US/Pacific'));

$hour = (int)$date->format('H');

if($hour < 6 || $hour > 21)
  die();

$kickstarter_url = 'https://www.kickstarter.com/projects/2052814389/get-your-money-together-your-purr-fect-finance-wor/stats.json?v=1';

$ch = curl_init($kickstarter_url);
curl_setopt($ch, CURLOPT_RETURNTRANSFER, true);
curl_setopt($ch, CURLOPT_USERAGENT, 'Mozilla/5.0 (Macintosh; Intel Mac OS X 10_12_6) AppleWebKit/537.36 (KHTML, like Gecko) Chrome/61.0.3163.100 Safari/537.36');
curl_setopt($ch, CURLOPT_HTTPHEADER, [
  'Accept: application/json'
]);
$data = curl_exec($ch);
$stats = json_decode($data, true);

if($stats) {
  $current = [
    'backers' => (int)$stats['project']['backers_count'],
    'pledged' => (float)$stats['project']['pledged']
  ];

  if(file_exists('stats.json')) {
    $previous = json_decode(file_get_contents('stats.json'), true);

    if($current['pledged'] > $previous['pledged']) {
      shell_exec('/home/pi/ding.sh');
      echo "Now $".$current['pledged']."\n";
    }
  }

  file_put_contents('stats.json', json_encode($current));
}
Replace the Kickstarter URL with your own of course. The script will cache the last seen amounts in a file called stats.json. Now you just need to set up a cron job to run this every 5 minutes!
*/5 * * * * /usr/bin/php /home/pi/cron.php >> /home/pi/cron.log 2>&1
Just for Fun
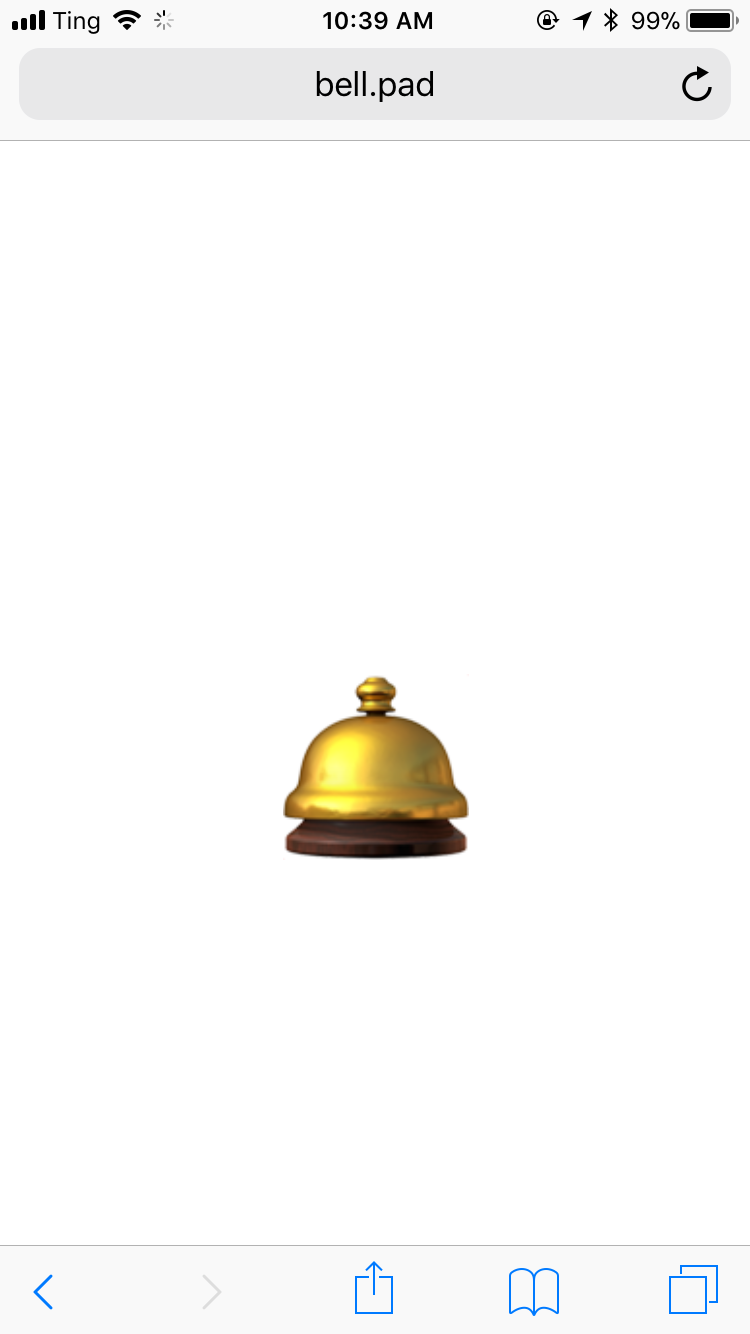
Just for fun, I also made a web page that I can load if I want to ring the bell manually, or from some other server in my house. Here's a really simple PHP script that you can set as index.php which will show a giant full-screen button and ring the bell when it's pressed.
You can also run this from an external script using curl:
curl http://bell.pad/ -d action=ring
I've set up a static IP address for my Pi at home and given it a DNS name on the local network, so I can refer to it as bell.pad from inside the house.
<!doctype html>
<html>
<head>
  <meta name="viewport" content="width=device-width, initial-scale=1">
  <title>Ring the Bell
</head>
<body>

<form action="/" method="post">
  <input type="hidden" name="action" value="ring">

  <div class="page">
    <input type="submit" value="🛎">
  </div>
</form>

<style>
body {
  font-family: sans-serif;
  margin: 0;
  padding: 0;
}
.page {
  display: flex;
  align-items: center;
  justify-content: center;
  width: 100vw;
  height: 100vh;
}
input {
  font-size: 70pt;
  width: 100vw;
  height: 100vh;
  background-color: #fff;
  border: none;
  -webkit-appearance: none;
}
</style>
</body>
</html>
<?php
if(isset($_POST['action']) && $_POST['action'] == 'ring') {
  shell_exec('/home/pi/ding.sh');
}
And here's how it looks on my phone!
And before you ask, no I'm not going to launch this as a Kickstarter project!


